QUICK START - DXF to Illustrator 2.2-OS
![]()
![]() THE CONVERSION IN 9 EASY STEPS
THE CONVERSION IN 9 EASY STEPS
1. Start the application DXF to Illustrator 2.2-OS
2. Choose "Setup" from the "File" menu.
A dialog box appears with settings for the conversion:
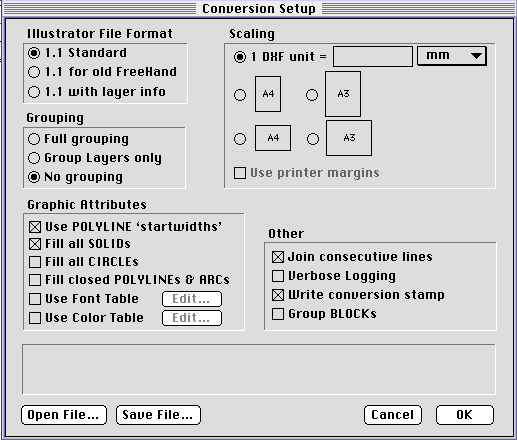
Figure 1 : Dialog box for Conversion Setup.
3. Change the following settings in this dialog box:
4. Select the OK button to confirm the settings. You can also save and load settings in setting files.
5. Select "Convert" from the "File" menu.
A dialog box appears for selecting the DXF file.
6. Select the DXF file which has to be converted.
A dialog box appears for naming and locating the file Illustrator file.
7. Enter a name and define the location for the Illustrator file which will be created.
The conversion will now start. The elements that are converted will be displayed on the screen in a seperate window. Elements currently being converted are drawn in this window. For speed considerations, text is NOT drawn. Elements drawn in blue indicate that these elements belong to a DXF BLOCK and will be grouped in the Illustrator file. Elemenst drawn in green indicate that these are DXF POLYLINEs and their startwidths will be used to scale their linewidths accordingly (see the appropriate setting in the setup dialog).
You can cancel the conversion by pressing the Command and Period keys simultaniously.
8. Click on the OK button when the conversion is ready (if the conversion is ready you will hear a sound).
9. Quit the DXF to Illustrator application by selecting "Quit" from the "File" menu.
![]()
Files converted with the "1.1 standard" or "1.1 for old Freehand" options can be opened by any Illustrator version. Files converted with the "1.1 with Layer Info" option can only be opened by Illustrator 5.0 or higher.
![]()
Only files saved with the option "1.1 for Freehand" can be converted correctly by Freehand versions prior to 5.0. Freehand versions 5.x can import files converted with the "1.1 with Layer Info" option selected ONLY if all paths have less than 1000 vertices. Freehand version 7 and higher will import all file types.
1. Start FreeHand
2. Select "Open" from the "File" menu.
A dialog box for selecting the illustrator file will appear.
3. Select the file which you converted with DXF to Illustrator.
The file will now (again) be converted. The file is opened as an "untitled" document.
4. Use "Save" or "Save as" from the "File" menu to store the Freehand file with an appropriate name.
![]()
A DXF file can be examined with the "DXF File Info" option in the "File" menu.The main function of "DXF File Info" is to estimate the dimension of the document in mm AFTER conversion, without actually having to convert the document.
Select the "DXF File Info" option in the "File" menu.
The program will now read the DXF file. After examining the file the program will show the results in a dialog box (see figure 2).
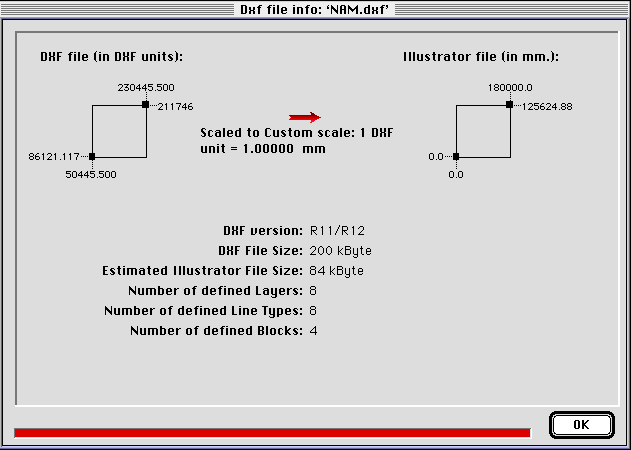
Figure 2: result of the "DXF File Info" command
The most important information given in this dialog box is:
For the calculation of the dimensions in mm the program will take the current scale setting from the Conversion Setup dialog box!
Using "DXF File Info", you are able to find an appropriate custom scale by a trial and error process in which one successively selects the "Setup" command , changes the custom scale, checks the "DXF File Info" command for the resulting dimensions, etcetera. until useful dimensions are found.
![]()
More information about DXF to Illustrator can be found at its official Home Page at: https://kartoweb.itc.nl/dxftoill
If you have questions or problems contact:
dxftoill@itc.nl
DISCLAIMER: Since the program became Freeware (OpenSource) in July 2002, we
do not provide official support.